Learn how to draw a tree the easy way, from a simple trunk to leafy branches. A beginner-friendly, step-by-step guide with no experience needed.
A tree might look complicated with all those leaves and branches, but it starts from two simple parts: a trunk and a rounded cloud of foliage. In this guide you'll learn how to draw a tree one calm step at a time, building from light guide lines to a leafy, natural shape. No experience needed and no fancy supplies. If you can draw a "Y," you can draw a tree.
We'll keep every line light at first so mistakes are easy to fix, then darken the lines you love at the end. Grab a pencil and let's begin.
What you'll need
- A pencil (a soft 2B is nice for light guide lines and shading, but any pencil works)
- An eraser
- Plain paper
- Optional: a black pen for outlining, plus crayons, markers, or colored pencils
How to draw a tree step by step
This is the foundation-first method nature artists teach: place the structure lightly, then add the leaves. Field-sketching educator John Muir Laws, author of The Laws Guide to Nature Drawing and Journaling, places his branch guidelines "lightly, loosely" first to set the overall shape before refining anything. We'll do the same.
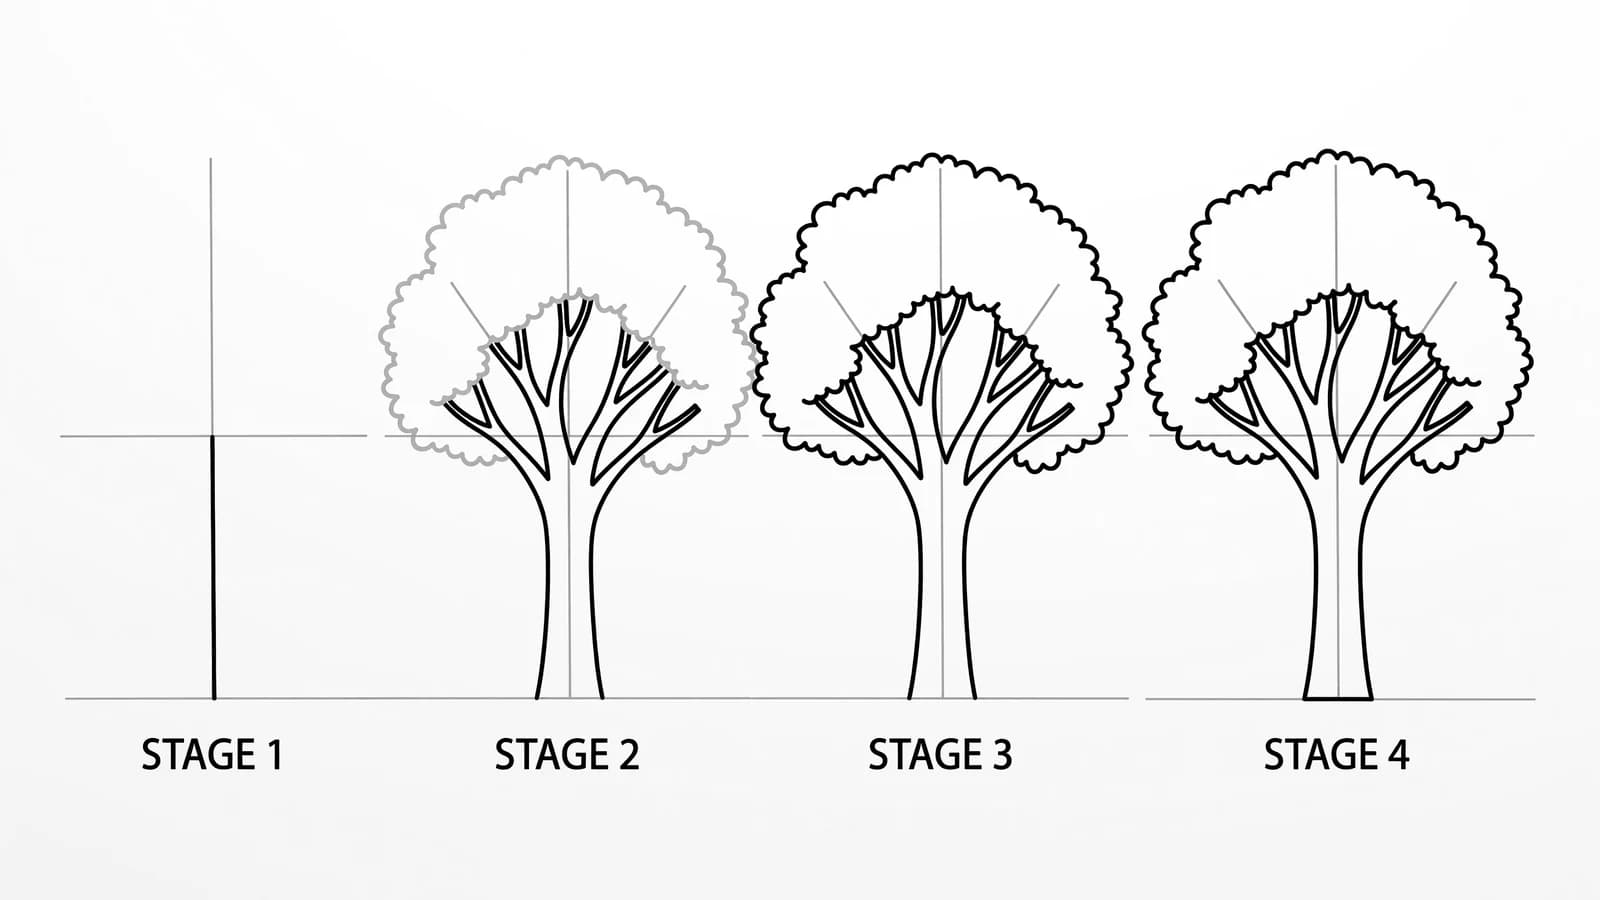
Step 1: Draw the trunk with two lines
Near the bottom of your paper, draw two lines that start wide at the ground and lean slightly toward each other as they go up. A tree trunk is thicker at the base than at the top. Curve the tip of the trunk a little instead of making it perfectly straight, so it looks like it grew.
Step 2: Split the trunk into main branches
At the top of the trunk, split the two lines into a few big branches, like a "Y" that keeps dividing. Make each branch narrower than the trunk, and point them in different directions. Keep these lines light. They are the skeleton the leaves will sit on.
Step 3: Add smaller branches
From each main branch, draw thinner branches that split off and reach outward and up. Make them narrower toward the tips. Avoid straight, evenly spaced lines. Real branches curve and bend at slightly random angles, and that's what makes a tree look natural.
Step 4: Draw the roots at the base
Where the trunk meets the ground, add a couple of short lines that flare out to each side, like the trunk is gripping the earth. Even two little roots make the tree feel planted instead of floating. Add a wavy ground line across the bottom too.
Step 5: Draw the foliage as bumpy clumps
Now draw the leaves as a big bumpy outline around the top branches, like a soft cloud made of scallops. Draw it as several rounded clumps rather than one smooth circle. This is the most important step for a real-looking tree, so take your time and let the edge wiggle in and out.
Step 6: Add bark and leaf texture
Inside the trunk, draw a few light curving lines for bark. In the foliage, add small random strokes and little clusters to suggest leaves, rather than drawing every single one. A few short marks here and there read as a whole tree full of leaves.
Step 7: Shade from light to dark
Pick a side for your light to come from, then lightly shade the opposite side of the trunk and the underside of each leaf clump. Build it up slowly. As tree tutorials advise, keep "adding more pencil marks and keep blending until you find the perfect contrast between the light and dark areas." Layers of light shading look better than one heavy press.
Step 8: Darken your favorite lines and color it in
Go over the outlines you want to keep with a firmer stroke or a black pen, then erase stray guide lines. Color the trunk brown and the leaves green, with darker green in the shadow clumps and lighter green where the light hits. Your tree is done.
What artists recommend (and common mistakes)
A few simple habits separate a real-looking tree from a flat one. Here is what nature drawing teachers say:
- Start light and loose. John Muir Laws places his branch guidelines "lightly, loosely" to find the shape first. Light lines are easy to move, so you can fix the whole tree before you commit to ink.
- Make branches irregular. Curve the tip of the trunk, vary the directions of the branches, and let them grow narrower toward the tips. Even, straight branches look fake, while a little randomness looks alive.
- Build leaves and shadow in layers. Lightly shade the whole tree first, then darken the shadow side bit by bit until the light and dark areas have a clear contrast. Patience here gives the tree real volume.
- The common mistake: the "lollipop" tree. A flat circle of leaves stuck on a stick is the classic beginner trap. In his tree-drawing workshop, John Muir Laws shows why building the foliage as several bumpy clumps with light and shadow fixes it, giving the tree depth instead of a flat ball.
- Draw what you see. As the influential drawing teacher Kimon Nicolaïdes wrote in The Natural Way to Draw, "The first function of an art student is to observe, to study nature." A glance at a real tree outside your window will teach you more than any single rule.
Fun variations to try
- Pine tree: skip the round foliage and draw a tall triangle made of stacked, downward zigzag rows of branches.
- Palm tree: draw a tall curved trunk with rings across it, then add long arching leaves fanning out from the very top.
- Christmas tree: draw a wide green triangle of stacked branch tiers, then decorate it with round ornaments, a star on top, and a little trunk at the bottom.
- Bare winter tree: skip the leaves entirely and draw all the branches splitting into smaller and smaller twigs against the sky.
Frequently asked questions
What is the easiest tree to draw? A simple round-topped tree is easiest: two lines for the trunk, a "Y" of branches, and a bumpy cloud of leaves on top. A pine tree is also easy, since it's mostly one tall triangle of zigzag branches.
How do I make my tree look real instead of flat? Draw the leaves as several bumpy clumps instead of one smooth circle, make the branches curve in slightly random directions, and shade one side darker so the tree has volume rather than looking like a lollipop.
Do I need special pencils? No. Any pencil works for a first tree. A soft 2B pencil is handy because it makes light guide lines and shades easily, but a regular school pencil is fine to start.
Keep drawing and coloring
That's it, you can draw a tree. Once you've drawn one, try a whole forest, a palm on a beach, or a pine in the snow, then print some art to color while you practice. Browse our nature coloring pages for trees, leaves, and landscapes to fill in, grab fresh things to draw when you want a new idea, and keep building your skills with our guides on how to draw a flower and how to draw a rose. Keep your pencil moving and have fun.