Tattoo Drawing Ideas for Beginners: 18 Easy Designs
July 6, 2025 · By Scribbloo
drawing ideascraft
Want easy tattoo drawing ideas for beginners? Start with a small heart, a star, or a simple flower, then work up to a rose, a skull, and a one-line dragon. Every design here is built from circles, ovals, and curved lines, so you can sketch any of them on paper with just a pencil. No experience needed.
Browse free nature coloring pages for line-art you can practice tracing.
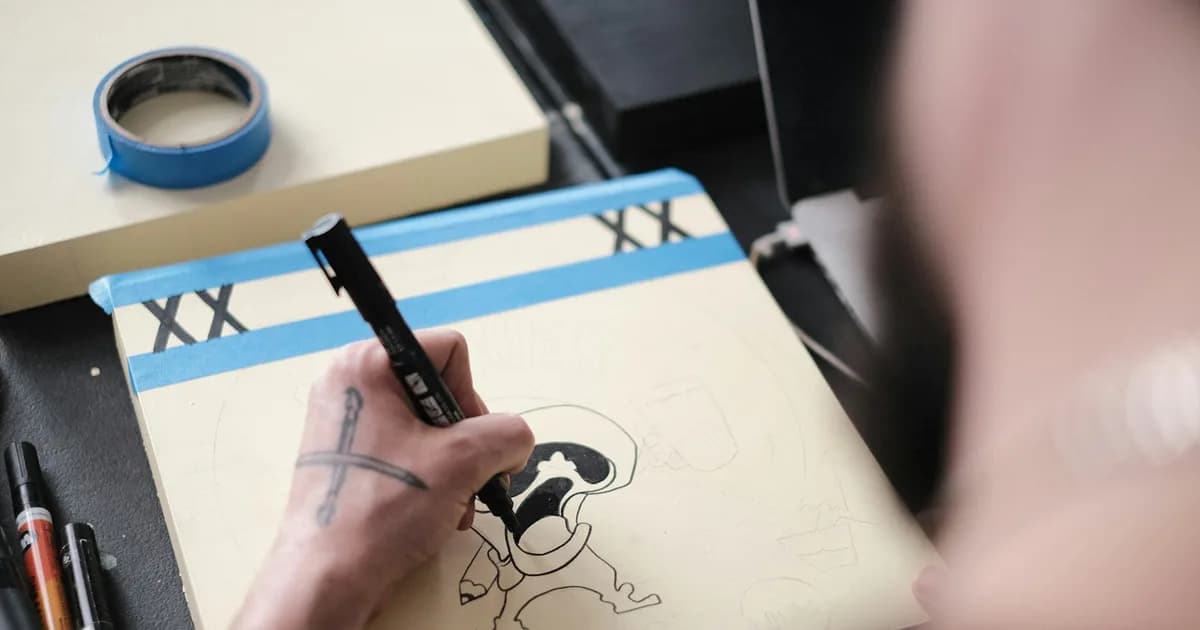
This guide is about drawing tattoo designs on paper, not putting ink on skin. Sketching a design first is exactly what tattoo artists do, and it is the safest, cheapest way to find a look you love before you ever book an appointment. The ideas below are sorted by theme, so you can scroll to whatever sounds fun and start.
Every design leans on shapes you already know how to make. That is the real reason a drawing turns out clean instead of frustrating. If you can draw a circle, an oval, and a curved line, you can draw all 18 of these.
What you'll need to sketch tattoo designs
You only need two things to start, and you probably have both in a drawer.
- A pencil. An HB is the everyday middle of the pencil scale, soft enough to sketch and easy to erase. For darker practice lines, reach for a 2B.
- An eraser, so your guide lines disappear at the end.
- A fineliner (optional, but worth it). A 0.3 mm tip is a great middle size, and a 0.5 mm tip gives you the bolder outline that tattoo designs are known for, per Uni PIN's drawing-pen range. Inking over your final pencil lines is what makes a sketch look like real flash art.
No fineliner? Any pen works to start. It will just be a little less crisp. Sketch loose and light in pencil first, then commit to your favorite lines.
One tattoo-design rule worth knowing. The classic "American traditional" style, made famous by Norman Collins (Sailor Jerry, 1911–1973), is built on bold black outlines and a small, punchy color palette of red, yellow, and green, according to the overview of old-school tattooing. That is great news for beginners, because bold, simple lines are far more forgiving than fine detail.
Easy symbol tattoos to draw
Symbols are the friendliest place to start. They are small, they read instantly, and a slightly wobbly line still looks intentional.
A tiny heart
A heart is two small bumps on top and a point at the bottom. Draw a soft sideways "U" for the dip in the middle, curve a hump up on each side, then bring both lines down to meet at a point. Keep it small and the shaky bits vanish.
A five-point star
Start with a light circle as a guide, then place five evenly spaced dots around it. Connect every dot to the two dots farthest from it, skipping its neighbors, and you get a clean star. Erase the circle at the end.
A crescent moon
Draw a circle, then draw a second curved line inside it, swinging from the top point to the bottom point. The sliver between the two curves is your crescent. Tiny dots around it make instant stars.
A little sun
Draw a small circle, then add short straight rays around the outside like a clock's hours. For a tattoo look, leave the center open and let the rays do the work, the same negative-space trick artists use so they aren't filling a solid disc.
An arrow
A straight line, a "V" arrowhead at one end, and two short fletching lines at the other. It is the easiest "meaningful" tattoo there is, and it lets you practice keeping a line straight.
A lightning bolt
A lightning bolt is one zigzag line. Draw a short stroke down and to one side, kick it back the other way, then down again, three or four sharp angles total. Trace a second line beside the first and close the ends to give it thickness. Sharp corners are easier to draw than smooth curves, so this is a confidence builder.
Easy flower and nature tattoos to draw
Botanical designs are the most popular beginner tattoos for a reason. The shapes are loose, so nothing has to be perfect.
A simple flower
Draw a small circle for the center, then add five or six rounded petals around it like a child's daisy. Add a stem and one leaf. This is outline-only, no shading, which is what makes simple flowers a favorite first design.
A rose (the classic)
A rose looks fancy but starts with a tiny spiral. Draw a small spiral in the center, then wrap soft, overlapping "U" shapes around it in widening layers. Five or six petals is plenty. Those overlapping curves are what make it read as a rose instead of a circle. Add a stem and two pointed leaves to finish. The traditional Sailor Jerry rose is built exactly this way, with bold lines and no fussy blending.
A leaf or sprig
Draw a gentle curved line for the stem, then add small teardrop leaves alternating down each side. A sprig of three to five leaves makes a delicate, modern-looking design.
A mountain range
Mountains are perfect practice, because rocky terrain is supposed to look jagged. Draw two or three uneven triangles in a row, add a wavy line near each peak for snow, and you are done. The "wobbly" line that frustrates beginners on smooth designs is actually an asset here.
A small wave
A wave is one curling line. Draw a long shallow curve, then loop the crest over on itself like the inside of a shell, and add two or three short lines underneath for foam. It is a calm, popular design that hides a shaky hand well.
Easy bold tattoos to draw
Once symbols feel comfortable, these are the designs that look the most like real flash art. They are still simple, just bolder.
A flat skull
Skip any sense of 3D and draw a flat skull: a rounded square for the cranium, a curved jaw underneath, two large oval eye sockets, an upside-down heart for the nose, and a row of simple square teeth. A flat skull is the easiest skull to draw because you are not trying to fake depth.
A small flame
Draw a teardrop, then add two or three smaller wavy peaks rising off its top, each a little taller in the middle. The irregular edges are forgiving, so a flame is a great way to practice loose outlining.
A one-line dragon
A minimalist dragon is just lines, no scales or shading. Draw a long curving "S" for the body and tail, add a simple head shape at the top, two small triangle wings, and a few short spikes down the back. Keep it to single clean lines and it stays elegant.
An anchor
Draw a vertical line, a ring at the top, a curved "U" cradle at the bottom with two points, and a short crossbar near the top. An anchor is a classic old-school motif and uses only straight lines and one curve.
A swallow
A swallow is two long, swooping wings, a small rounded body between them, and a forked "V" tail. It is one of the most recognizable traditional designs and draws fast once you get the wing curve.
Easy lettering and number tattoos
Words and dates make some of the most personal tattoos, and they are pure line practice.
A single word or initial
Pick one short word or a single initial and write it slowly in a style you like. Sketch it lightly first, then thicken the downstrokes for a hand-lettered feel.
A date in Roman numerals
A date turns into a clean, simple design as Roman numerals. Write it lightly, then go over each stroke with even pressure. It is meaningful without needing any drawing at all.
Tips to make your tattoo sketches look better
A few habits separate a stiff doodle from a design that looks ready to ink.
- Sketch light, commit later. Rough everything in with a light HB pencil first. Only press hard or ink once you are happy with the shape, so guide lines stay easy to erase.
- Bolder beats finer for beginners. A confident thick line hides a wobble. A thin, hesitant line shows every shake. This is why traditional designs use bold outlines.
- Combine two simple symbols. A heart with a tiny banner, an arrow through a crescent moon, a rose beside an initial. Pairing two shapes you already drew makes a design feel custom.
- Draw it three times. The first is careful, the second is looser, the third is actually good. Repetition memorizes the shape without you trying.
- Sketch it at real size. A tiny finger tattoo and a forearm piece are drawn differently. Designs shrink poorly, so draw small ideas small and keep the detail minimal.
Frequently asked questions
What is the easiest tattoo to draw for beginners?
A small heart, star, or simple flower is the easiest tattoo to draw for beginners. Each one is built from a couple of curved lines or a circle with petals, needs no shading, and still reads clearly. Start there, then work up to a rose or a skull once the simple shapes feel natural.
Can I design my own tattoo if I can't draw?
Yes. You only need a clear idea and a rough sketch, not artistic skill. Build your design from simple shapes, combine two symbols that mean something to you, and let the lines stay loose. A tattoo artist takes your concept and refines it, so your sketch only needs to show the idea.
What pen should I use to draw tattoo designs?
Sketch with an HB pencil first so you can erase freely, then ink your final lines with a fineliner. A 0.3 mm tip suits detail and a 0.5 mm tip gives the bolder outline traditional designs are known for. Any pen works to start; the crisp tip just makes it look more like real flash art.
What style of tattoo is best for a beginner to draw?
American traditional, or "old-school," is the friendliest style for beginners. It uses bold black outlines and a small palette of red, yellow, and green, so you are drawing clean, confident lines instead of fine detail or complex shading. Roses, hearts, anchors, and swallows are all classic traditional shapes.
Sketch it, then color it in
The whole secret to drawing tattoo designs is hiding in plain sight: almost every one is a small set of simple shapes with a bold line around it. A heart is two bumps and a point. A rose is a spiral wrapped in soft "U" curves. A mountain is a few uneven triangles. Build from the shapes you already know and the design follows.
Pick one idea, sketch it three times, and ink your favorite version. Once you have a design you love, print a nature coloring page or one of our fantasy coloring pages and color in similar line art to get a feel for how your design fills the space. If you want more shapes to practice, the easy drawing ideas for beginners guide is a friendly next step.